Monday, August 31, 2015

Peanut Butter Pie

Jess doesn't like cake, so for his birthday I usually make a pie! Last year it was coconut cream, this year it was peanut butter! I had never made a peanut butter pie before but I didn't think it could be that difficult, and I was correct. I whipped this one together over my lunch break!

We celebrated with some Giordano's stuffed pizza (I had my own extra-thin crust because I hate deep dish!) and then finished up with the pie. It was delicious and took no time at all, maybe 10 minutes of prep and another 5 minutes of dishes. So a very easy dessert and one that goes over well for anyone who loves peanut butter as much as we do!

It looks so plain...maybe I should've added some cool whip or something...
I used fat free & reduced fat ingredients when possible, just because that's how I roll.. it would probably be more rich if you used full-fat, so by all means do it if you want to!

Ingredients
8 oz fat free cream cheese
1 cup creamy reduced fat peanut butter
3/4 cup + 2 tbsp powdered sugar
1 cup heavy cream
1 tsp vanilla extract
1 graham cracker crust (either make your own or a pre-made, I used reduced fat)

Instructions
Mix together peanut butter, cream cheese, and 3/4 cup powdered sugar until well combined.

In separate bowl, whisk heavy cream until light and fluffy.

Add 2 tablespoons powdered sugar and vanilla extract to heavy cream, whip until peaks form.

Stir the heavy cream into the peanut butter mixture until smooth.

Pour into pie crust and refrigerate for 3+ hours.

You can definitely add crumbled Reese's, chocolate chips, or chocolate fudge/syrup if you want ot be extra-fancy. I didn't because Jess doesn't like chocolate...I know, what kind of monster doesn't like cake or chocolate?!
I was quite proud of the pie! haha

Thursday, August 27, 2015

Cleaning your Keurig

I would like to preface this post with this: yes, I know Keurigs are expensive and poor for the environment, but I use one anyway. Jess and I rarely drink coffee at home, it is pretty much just on the weekends, and even then it is only one or two cups, therefore it is way more convenient to be able to press a button and get one mug of coffee instead of changing filters, keeping a container of coffee that will probably go stale before we use it, and then having to clean out a pot just for that one or two cups.

Thus: I use a Keurig and will continue to use it. Sorry 'boutcha.

We recently acquired a new one when Jess's office remodeled and they got replaced theirs. We did have the one that you had to add water for each cup of coffee, but now we have one with a reservoir. Moving on up in the world.

Keurigs can get pretty dusty and the inside can get scaly if you just use tap water (like we do), so every now and then (read: whenever you can't take it anymore) you should give it a good cleaning inside and out. While it is probably intuitive to most people that you can and should take it apart and clean it, this is how I clean mine. It's easy!

Here's what you need: soap & water, cleaning wipes, white vinegar, some time

Here's what you do:

Unplug the Keurig and remove the drip pan, water reservoir (if you've got one), and K-cup holder basket. Most of these things can go in the dishwasher, but I just washed them in the sink and let them dry in a strainer.

Wipe down the inside where the K-cups go. You may need to use toothpicks or Q-tips to get down in the crevices. There will probably be coffee grounds abound, so you might have to wipe the counter off later.

Close the lid and wipe the outside down well with the cleaning wipes or spray/paper towels. If there are some spots that are scaly and white, just put a little bit of vinegar on a paper towel and use that to clean off the mineral deposits.

Put it all back together and fill the reservoir up with white vinegar, I just used a whole small bottle. It filled the reservoir up about 2/3 of the way. Run the Keurig through until it tells you to add water, then dump out the remaining vinegar (or not, you do you) and rinse. Fill the reservoir with water and repeat until the water coming back out doesn't smell like vinegar.

Bask in the glory that is the single-cup coffeemaker!

Monday, August 24, 2015

Green Chickpea & Chicken Curry

Jess gets into these kicks when he finds a particular food he likes where he wants to eat it all the time; it is currently Indian food, but before that it was Thai.  So I have been casually looking around for recipes to save us some money when we get to craving various Asian foods.

I found this Chickpea Curry recipe by Dana at Minimalist Baker and it immediately sounded good. While we don't usually order curry, we have tried it and liked it. Jess isn't about the vegetarian lifestyle, so I went ahead and added a chicken breast. But you definitely do not have to! This has a lot of flavor and depth and all that stuff without it.

I altered the recipe just a bit, but not a ton. If you'd like the vegan version, then head on over to the link above.

Ingredients
2 tablespoons coconut oil
4 clove garlic, minced
1/2 small onion, diced
1 tsp ground ginger
1 shredded carrot
1 chicken breast, diced
3.5 tablespoons green curry paste
15 oz chickpeas (garbanzo beans), drained and rinsed
14 oz light coconut milk
1 1/2 cups chicken broth
3 tablespoons honey
1 teaspoon lime juice
1/2 cup dry Jasmine rice

Instructions
Heat oil in a large skillet and add garlic, onion, carrot, ginger, and chicken. Cook until chicken is done.

Add curry paste and stir, cook 1 minute.

Add chickpeas and cook another 3-4 minutes.

Add coconut milk, chicken broth, honey, and lime juice. Bring to a boil then stir in rice.  Turn down to a simmer, cover, and cook 15-20 minutes or until rice is done cooking.
I let mine simmer a little longer with the lid off...solely because we weren't ready to eat yet. That made it thicken up a bit, so more stew-ish than a traditional curry, but still delicious!
I'll probably add more carrots in the future, and maybe some cayenne pepper for more heat.

Saturday, August 22, 2015

Keeping up with the Cleaning

Sorry this is late! I had a really busy Thursday and completely forgot yesterday, so here it is.

It is probably pretty obvious with my organization and Type A-ness that I need things to be clean. Not just clutter-free, but I love having a dust-free home, too! Obviously this is not always achievable, but as a general rule I do 30 minutes of moderate cleaning every weekday and then every two to three weeks I will spend an afternoon deep-cleaning.

On a day-to-day basis I'm a big fan of Clorox disinfecting and cleaning wipes for cleaning bathroom and kitchen surfaces. However every other week I will use a sponge and Clorox Bleach cleaner spray, being careful not to get any on my clothes and rinsing thoroughly! I have a feather duster that I use regularly for a light cleaning, then pledge and a dusting cloth for the deep-cleaning days. That is how I differentiate between a "moderate" and a "deep" cleaning day, it is pretty simple.
My cleaning bucket! I started as my shower bucket at AXO, decorated by my Big Sis, and it has evolved from there. 

Monday: wipe down bathroom counter & sink, clean mirror clean toilet, clean shower

Tuesday: clean kitchen counters, sink, stove, microwave, and refrigerator door/handles

Wednesday: sweep bathroom and kitchen/entry (I also mop these floors every other week or as needed...ahem, dogs.)

Thursday: dust literally every surface that didn't get wiped down on Monday & Tuesday (bookshelves, nightstands, coffee table, TV stand, wine rack, etc.)

Friday: vacuum all carpet (bedroom, living room, and rugs for me)


This schedule works for me because A. I have a flexible work schedule where I'm generally home early and can fit in 20-40 minutes of cleaning every day and B. I have a tiny apartment. I realize that people who have more than 4 rooms in their home, have children, or a much longer workday would struggle with keeping up a routine like this, but I encourage you to set a schedule that works for you and maintain it. I have events in my phone calendar so that it is a recurring reminder that "oh I've gotta sweep the floors when I get home today." Once you do it for a few weeks it becomes second nature, promise. AND you'll feel so much better and rarely* have those "my house is so dirty I have to spend 7 hours making it presentable to company" days.


*I cannot promise "never"

Monday, August 17, 2015

Meal Planning: Snacks

I had to stop myself from calling them "snackies" in the title, because that's typically how I refer to them on a day-to-day basis...because apparently I'm a child.
I've recently discovered this and love it. I just wish it was in water and not "extra light syrup."
This has been established, but I'm really a snacker. I eat when I'm bored or sit still for too long. I've tried to stop  but that just turns me into a hangry monster. So, now I just try to make sure my snacks are healthy and controlled.

1. Fruit - apples, mangoes, grapefruit, berries, bananas & peanut butter (reduced fat)

2. Pretzel sticks - you can eat like 100 of these and it's still only a few calories.

3. Sugar free pudding - just make sure it is sugar free!

4. Popcorn - any and all of it. It's healthier if you pop it yourself, but microwave popcorn is just too easy.

5. Tea - I'm not a huge tea fan, but I have noticed that if I drink a cup of hot herbal tea it reduces my boredom and hunger, so that's good. I like fruity teas: pomegranate or apple.

Thursday, August 13, 2015

Meal Planning: Lunch

Here's post #2 about meal planning; this one is focused on easy and healthy lunches. I currently go home for lunch almost every day because I live so close to work. It's nice for me to get away from the lab for a bit and also the dogs like a potty break during the day. Some of these may not be as feasible if you have to pack a lunch, but can be reserved for a day you're home.

1. Lipton Extra Noodle Soup - this is a staple. a go-to. a favorite. I grew up eating this whenever we just needed something quick or if we were sick. Now when I'm sick I crave it! But I've also recognized that it's pretty filling and not too bad for you. 

2. Tuna & Crackers - fairly self-explanatory. I like Kroger's variation of Wheat Thins. Now Starkist is making some flavored tuna packets and some of them are pretty good, I especially like the hickory flavor. 

3. Tuna Noodle Almost-Casserole - Cook 1-2oz egg noodles, some peas, carrots, and/or broccoli, toss with a packet of tuna, a few spoonfuls of plain low-fat Greek yogurt, salt, & pepper. It's simple but very filling. 

4. Wraps - I'll put pretty much anything in a Flatout Light Wrap. Some of my favorites are buffalo chicken (shredded chicken, Frank's hot sauce, mozzarella cheese, lettuce), Caesar (shredded chicken, light/fat free Caesar dressing, parmesan or mozzarella, lettuce), and pizza (pepperoni, mozzarella, olives, and tomatoes). 

5. Leftovers - Sometimes I'll just go ahead and set aside a container from dinner to eat the next day, pastas and soups seem to get better when they sit in the fridge overnight! 

Monday, August 10, 2015

Meal Planning: Breakfast

(sorry...no fancy photos here...)

I'm quite organized and get a little flustered when I don't have a plan for things. Therefore, I have a clear vision of most meals that I'm going to eat for...embarrassingly...several weeks into the future. This post and the next two will just be short lists of things that I eat for breakfast, lunch, and snacks in case you're looking for some inspiration.
My pretty cake stand doubles as a fruit stand whenever I don't have cake...
I usually keep my options open with breakfast, and grab whatever I'm feeling like that morning. But I always always always keep at least one "basic breakfast" in the kitchen so I don't find myself splurging at Panera twice a week or whatever...sometimes is ok, but not regularly.

1. Toast - with butter, peanut butter, a reasonable* amount of Nutella, jelly if you like it

2. Oatmeal - Quaker Lower Sugar instant oatmeal alone or with a sliced banana

3. Fruit - an apple, some mixed berries, a mango, grapefruit, some combination of all of these

4. Freezer Waffles - sometimes you just need an Eggo Blueberry Toaster Waffle...


*HA HA HA HA good luck

Thursday, August 6, 2015

Strawberry Cake with homemade Rainbow Chip Frosting

Did you know that Betty Crocker's Rainbow Chip Frosting was discontinued? And then brought back? Only to be hard as hell to find? Well it was and is.

When my bestie was coming to visit to celebrate her 25th birthday I knew I had to make her a cake, duhhhhh! Her favorite is rainbow chip, no big deal.

Or so I thought.

I couldn't find it anywhere (the frosting, I was making a different cake, more on that later). So I started Googling. Sure enough, it was discontinued about a year ago. People apparently went crazy and even started a petition to bring it back! Which, Betty Crocker obliged and it was in production again. I went everywhere: Kroger(s), Marsh(es), and Target(s). I looked online: Target, Walmart, Amazon, eBay (SERIOUSLY?!). I asked at one Target and the guy stocking the shelves laughed at me. HE LAUGHED AT ME. So basically the moral of the story is: rainbow chip frosting is as elusive as a snipe.

Next step: Pinterest homemade rainbow chip frosting. SUCCESS. Ali McDerment posted a recipe on her blog and that's the one I used. However, in the future I would adjust, so I'm going to give you the new recipe with adjustments. The original had too many rainbow chips (I know, I know, how??) and it made it difficult to spread and was tearing up my cake. I also did not use my own frosting because...time. Haha.

I used a recipe for a strawberry cake-half-from-a-box from Call Me PMC and loved the way it turned out. That is below the recipe for rainbow chips...which is actually super easy, by the way.

Ingredients (Rainbow Chip Frosting)
6 oz white chocolate chips
Food coloring
1 container vanilla or cream cheese (or whatever) cake frosting
....yes, that is all.

Instructions
I have no photos of this...sorrrryyyy. Go to the website above, she has photos. Divide the white chocolate chips between 4 small bowls (I know it doesn't seem like a lot, but it will be). Working one bowl at a time, melt completely by microwaving and stirring every 10-15 seconds. Add 3-5 drops food coloring, depending on how vibrant you want your chips, and stir well. Pour onto a parchment (or wax) paper lined baking sheet and spread thin. The thinner the chocolate, the easier it is to cut up. Put in the freezer for about an hour, remove and cut up into desired-size pieces. Mix into frosting. The end.


Ingredients (Strawberry Cake)
1 package cake mix (I used Rainbow Chip)
1 3 oz package of Strawberry Jello
1 cup diced strawberries
1/2 cup vegetable oil
1/2 cup whole milk (I used 1/4 cup 1% milk and 1/4 cup heavy cream)
4 eggs

Instructions
Preheat oven to 350 and lightly grease desired baking pan, I used 8" round. Combine all ingredients and mix for 3 minutes, scraping down sides as needed. Divide in half (for layer cake) and pour into baking pan, bake as directed on box. Mine was for 28-32 minutes.

Let cool. I recommend freezing for about 30 minutes before frosting, it makes it easier.


Tuesday, August 4, 2015

Buff Chick Burgers & Baked Zucchini Fries

Buffalo chicken (or buff chick as we regularly refer to it) is a pretty common meal at our place. I've made wings, dip, meatballs, wraps, and probably other things I'm forgetting. So basically, Frank's Hot Sauce is a staple. I found this recipe on Pinterest (where else, right?) and just tucked it away for a while. Then I tried it. Now I'm in love.

These burgers are easy and use simple ingredients. They are much less messy than wings but you still get that chicken-wing feel and taste. They're great for a night when you're craving some buff chick but don't want to deal with eating wings OR if you want a "burger" but don't want the standard day-to-day hamburger.

I served these on pretzel buns from the Kroger bakery and with baked zucchini fries...which are a whole different story.

I can't tell you where I first came across zucchini fries, because it has been years and probably a hundred versions of the recipe ago. I actually cannot believe that I've never blogged about them, we eat them all the time! They are time consuming, but so addicting and delicious. It is one sure way to get Jess to eat all of his green vegetables. And they go great with sandwiches because they are definitely a finger food!

Ingredients (Buffalo Chicken Burgers)
1 lb ground chicken
1/4 cup (about 3-5 green onions)
2 cloves garlic, minced
1/4 cup plain breadcrumbs
1 tsp salt
1/2 tsp pepper
1 tsp dill weed
1 tsp minced parsley
1/2 cup buffalo sauce, divided
2 tablespoons oil
Optional: whatever you eat on a burger and/or wings!

Instructions
Combine everything except 1/4 cup buffalo sauce and mix well.

Divide mixture and make four patties.

Heat up 2 tablespoons oil (I used vegetable) in a large skillet to medium. Cook burgers 8-10 minutes on each side. Add remaining 1/4 cup buffalo sauce to pan/on top of burgers and cook another minute on each side.
I promise they weren't burnt...
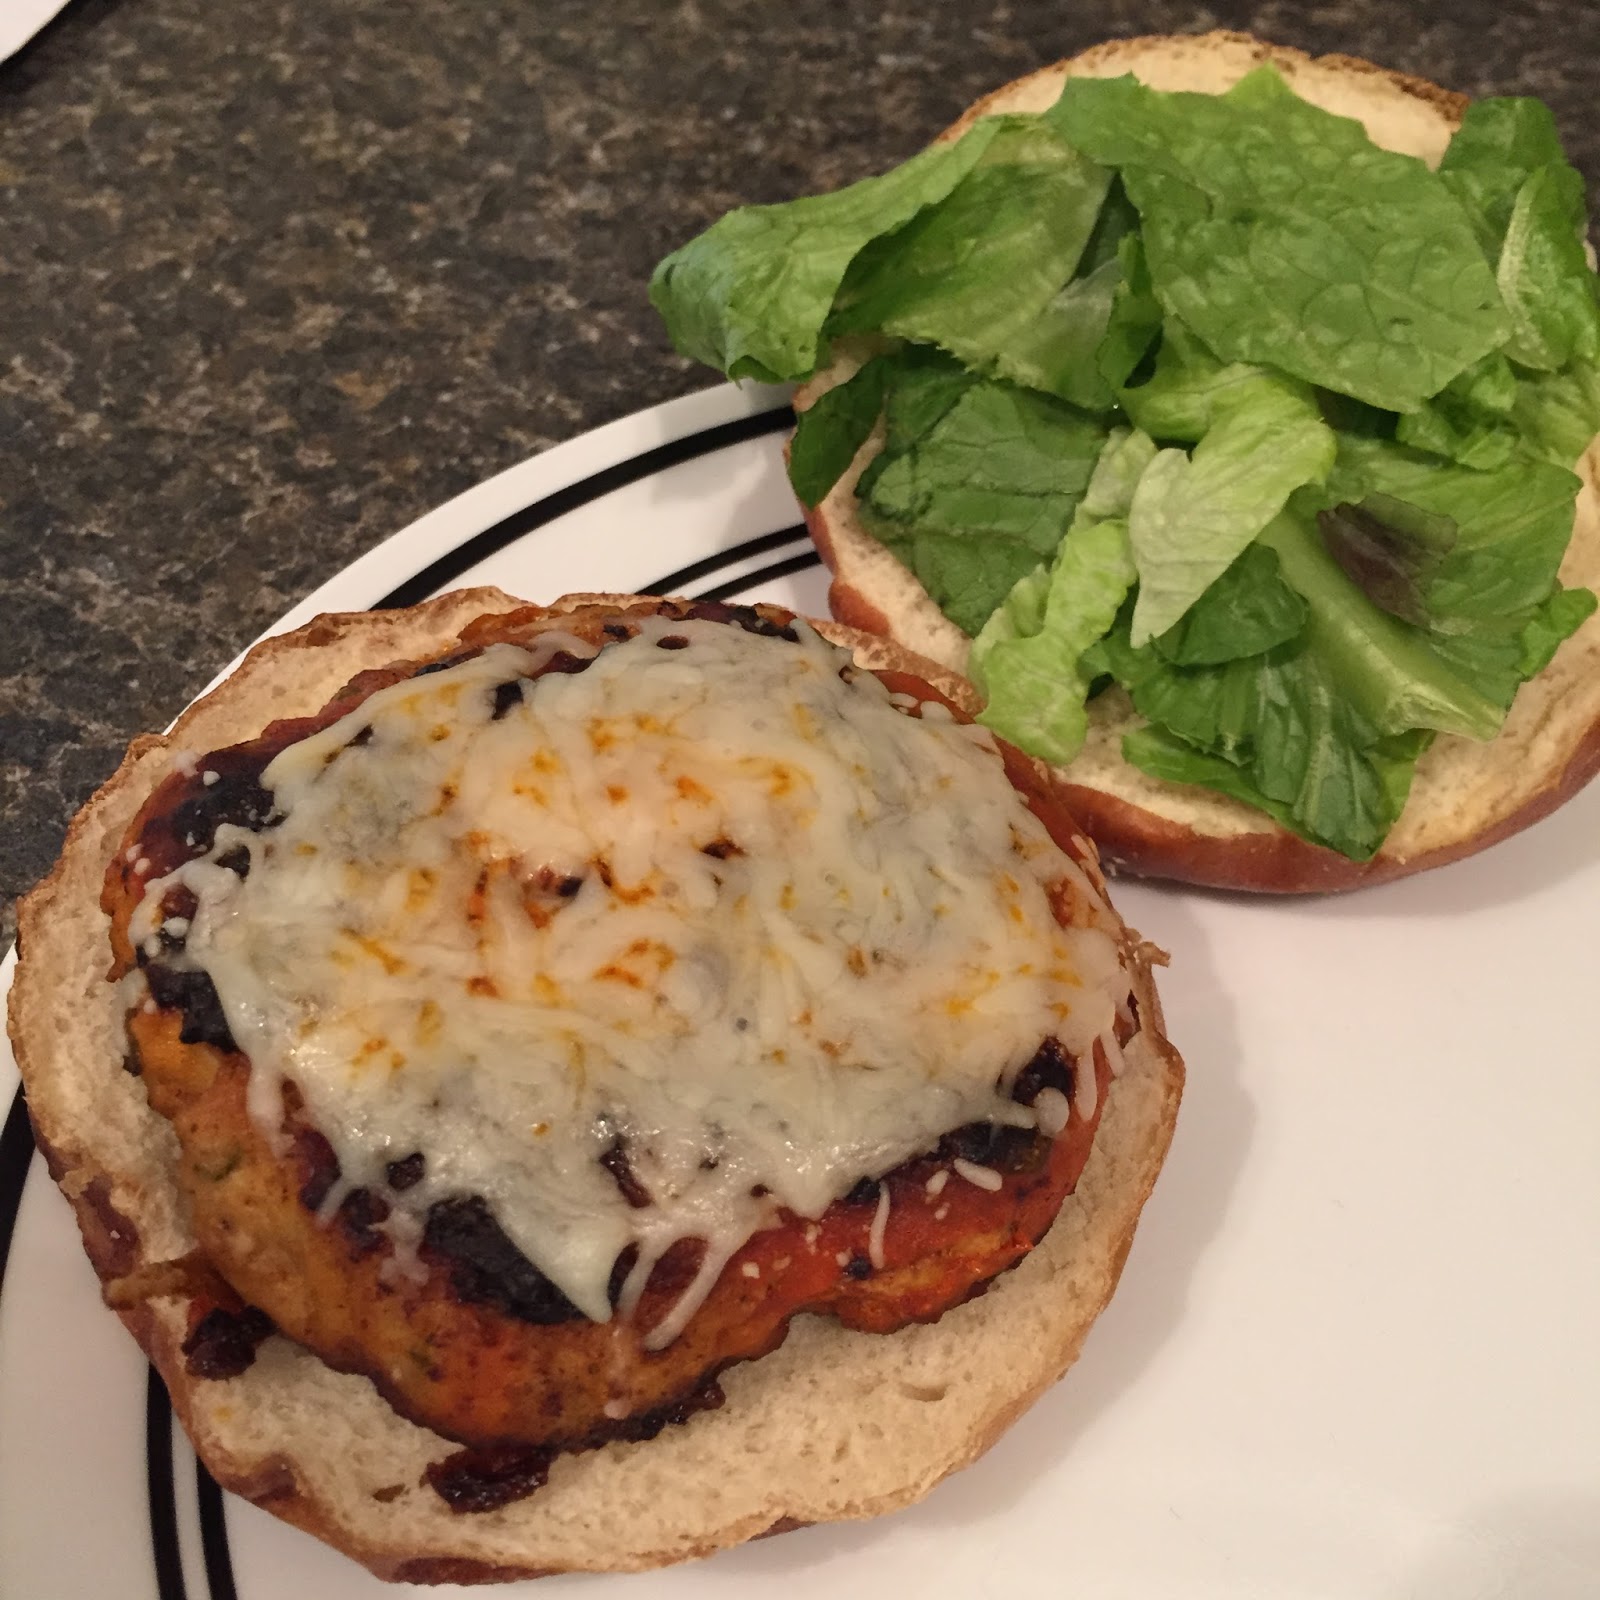
Top with cheese if desired and serve!

We added mozzarella and lettuce. Jess said he wished we had mayo...but we didn't. They would probably be delicious with ranch and blue cheese, too, if you wanted more of a classic wing-taste!


Ingredients (Zucchini Fries)
2 zucchini, cut into fry-shapes
1/2 cup flour
salt & pepper
2 eggs
1 squeeze Dijon mustard
dash milk
1/2-1 cup panko

Instructions
Preheat oven to 400 degrees F and line a baking dish with foil. I use this roasting pan with holes in it over a foil lined pan so I only have to clean one. You don't have to, but I like using a pan where air can get underneath the fries so they get a little crisper.

In a large ziploc bag, combine flour and salt & pepper to taste. Add zucchini slices, seal, and toss to coat.

In a shallow dish, combine eggs, dijon, and milk. You may have to make more of this, depending on how many fries you're coating. Pour panko breadcrumbs in another shallow dish.

Bread the fries by shaking off the excess flour, dredging in egg, then pressing into the panko to coat all sides. Then place on baking sheet.

Bake for 25 minutes and enjoy!
Like, really enjoy..because this is a GOOD dinner.
Gordon would be disappointed in my plating, ohhh well!