Thursday, September 3, 2015

Bachelorette Party Gift Bags

One of my Little Sisters is getting married this fall! Yayyy!

Her bachelorette party was last weekend, a whole day & night of fun downtown. 

While I didn't plan the party itself, I was put in charge of creating a little survival kit or party favor bags to give to all of the guests and let me tell you...IT WAS TOO MUCH FUN!

I seriously spent weeks poring over Pinterest looking for the best ideas, making lists, going to craft stores and liquor stores, perusing Etsy. Then the shopping began, then the assembly. I'm actually still excited about them and can't wait until the next opportunity to do something similar. 

There were a total of 11 guests, including myself and the bride and it ended up costing about $130 total after everything was done, so just over $11 per bag. I bought everything in stages over the course of several months, so I was able to budget a small bit of money every few weeks for buying supplies to make it work out fine. There is definitely room to cut back, too, if you'd like to do something similar but not spend as much money. For example, the coozies were $5 each and are totally optional...although adorable, more on those later. The little one-shot alcohol bottles are $1 each and can add up quickly if you have a large guest list, and chances are you will already have enough alcohol around ;) 

The two things I ordered special for these gift bags were the coozies and the elastic to make the hair ties. I ordered 5/8" Fold Over Elastic to make the hair ties myself since they are SO expensive to buy at the store. This shop was prompt, affordable, and has pretty much any color or amount you could ever need, Pretty NEZ Supplies, check them out! I can't take credit for the genius idea of buying this elastic in bulk, that belongs to The Superettes. You can make them any size you want, I cut mine to 9" so they'd comfortably fit around a wrist but still make a solid ponytail. 

The coozies came from Brant Point Prep on Etsy. Tiffany was extremely attentive and easy to work with and she has so many cute items in her shop! I highly recommend it for anyone looking for cute monogrammed items. I actually misspelled someones name in my original order and had to reorder one additional coozie and she got it out immediately! The turnaround was very quick, it shipped the day after I ordered them. And, come one, these are the cutest things ever. 
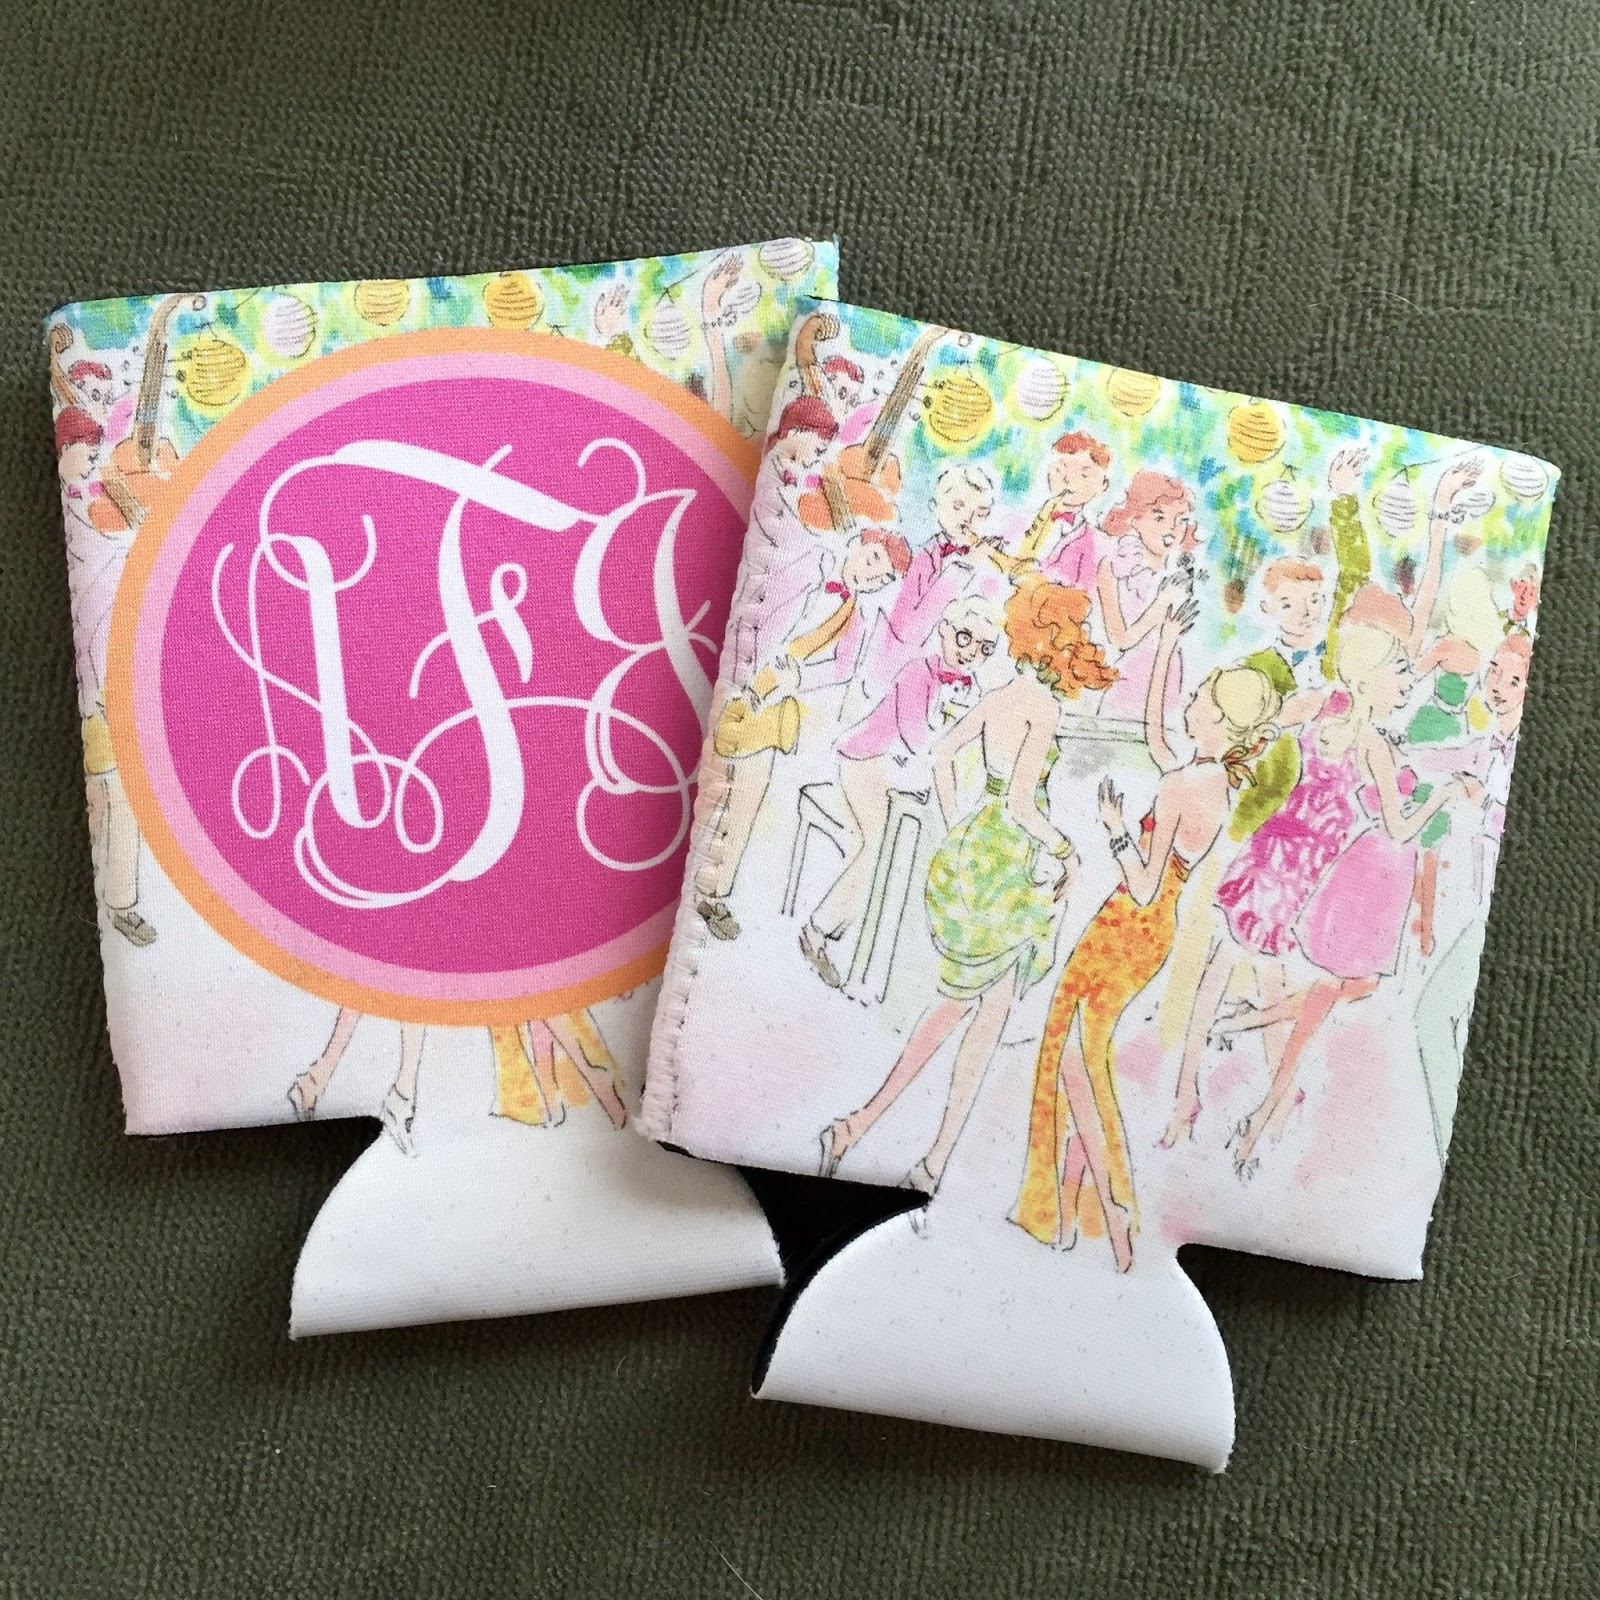
LOOK AT IT. 

So here is what went into my bags: 

1. Monogrammed Coozie - The monogram is on one side and other just has the adorable Lilly print! 

2. Hair Ties - I cut some scrapbook paper into rectangles so that the hair ties fit snugly and wrote "To have and to hold ...your hair back" at the top. 

3. Nail Files - because there's not much worse than a hangnail on a night out. 

4. Make-up Remover Wipes - I found these individually wrapped wipes in 3-packs at the Dollar Tree. 

5. Basic First Aid - "first aid" may be a bit of an overkill here, but everyone got a packet of ibuprofen, 2 pepto-bismol tablets, and 2 bandaids. 

6. Snacks - everyone got some baby Reese's, a pack of Teddy Graham's and then another pack of cookies out of the variety pack, either Oreos, Chis Ahoy, or Nutter Butters. 

7. Water - hydration is key on a weekend like this! 

8. 5-Hour Energy - because, well, it was a long day! 

9. Tiny Alcohol - half of the people got Smirnoff Vodka and half got Jim Beam Red Stag. The bride got a whiskey sampler because she loves Jim, which included Red Stag, Jim Beam Honey, and classic Jim Beam. 
Everything just barely fit...
Jamison & Ginger Ale were quite intrigued. 

Coozie and hair ties. 

Nail file, makeup remover, bandaids, ibuprofen, & pepto.

Snackies. 

Liquid sustenance. 

Once I had everything purchased I put them in these little labeled gift bags, added some tissue paper, put some curling ribbon on the bride's and called it a day! And then they sat in my kitchen for two weeks and I got ridiculously excited to give them to my friends every time I saw them...

Monday, August 31, 2015

Peanut Butter Pie

Jess doesn't like cake, so for his birthday I usually make a pie! Last year it was coconut cream, this year it was peanut butter! I had never made a peanut butter pie before but I didn't think it could be that difficult, and I was correct. I whipped this one together over my lunch break!

We celebrated with some Giordano's stuffed pizza (I had my own extra-thin crust because I hate deep dish!) and then finished up with the pie. It was delicious and took no time at all, maybe 10 minutes of prep and another 5 minutes of dishes. So a very easy dessert and one that goes over well for anyone who loves peanut butter as much as we do!

It looks so plain...maybe I should've added some cool whip or something...
I used fat free & reduced fat ingredients when possible, just because that's how I roll.. it would probably be more rich if you used full-fat, so by all means do it if you want to!

Ingredients
8 oz fat free cream cheese
1 cup creamy reduced fat peanut butter
3/4 cup + 2 tbsp powdered sugar
1 cup heavy cream
1 tsp vanilla extract
1 graham cracker crust (either make your own or a pre-made, I used reduced fat)

Instructions
Mix together peanut butter, cream cheese, and 3/4 cup powdered sugar until well combined.

In separate bowl, whisk heavy cream until light and fluffy.

Add 2 tablespoons powdered sugar and vanilla extract to heavy cream, whip until peaks form.

Stir the heavy cream into the peanut butter mixture until smooth.

Pour into pie crust and refrigerate for 3+ hours.

You can definitely add crumbled Reese's, chocolate chips, or chocolate fudge/syrup if you want ot be extra-fancy. I didn't because Jess doesn't like chocolate...I know, what kind of monster doesn't like cake or chocolate?!
I was quite proud of the pie! haha

Thursday, August 27, 2015

Cleaning your Keurig

I would like to preface this post with this: yes, I know Keurigs are expensive and poor for the environment, but I use one anyway. Jess and I rarely drink coffee at home, it is pretty much just on the weekends, and even then it is only one or two cups, therefore it is way more convenient to be able to press a button and get one mug of coffee instead of changing filters, keeping a container of coffee that will probably go stale before we use it, and then having to clean out a pot just for that one or two cups.

Thus: I use a Keurig and will continue to use it. Sorry 'boutcha.

We recently acquired a new one when Jess's office remodeled and they got replaced theirs. We did have the one that you had to add water for each cup of coffee, but now we have one with a reservoir. Moving on up in the world.

Keurigs can get pretty dusty and the inside can get scaly if you just use tap water (like we do), so every now and then (read: whenever you can't take it anymore) you should give it a good cleaning inside and out. While it is probably intuitive to most people that you can and should take it apart and clean it, this is how I clean mine. It's easy!

Here's what you need: soap & water, cleaning wipes, white vinegar, some time

Here's what you do:

Unplug the Keurig and remove the drip pan, water reservoir (if you've got one), and K-cup holder basket. Most of these things can go in the dishwasher, but I just washed them in the sink and let them dry in a strainer.

Wipe down the inside where the K-cups go. You may need to use toothpicks or Q-tips to get down in the crevices. There will probably be coffee grounds abound, so you might have to wipe the counter off later.

Close the lid and wipe the outside down well with the cleaning wipes or spray/paper towels. If there are some spots that are scaly and white, just put a little bit of vinegar on a paper towel and use that to clean off the mineral deposits.

Put it all back together and fill the reservoir up with white vinegar, I just used a whole small bottle. It filled the reservoir up about 2/3 of the way. Run the Keurig through until it tells you to add water, then dump out the remaining vinegar (or not, you do you) and rinse. Fill the reservoir with water and repeat until the water coming back out doesn't smell like vinegar.

Bask in the glory that is the single-cup coffeemaker!

Monday, August 24, 2015

Green Chickpea & Chicken Curry

Jess gets into these kicks when he finds a particular food he likes where he wants to eat it all the time; it is currently Indian food, but before that it was Thai.  So I have been casually looking around for recipes to save us some money when we get to craving various Asian foods.

I found this Chickpea Curry recipe by Dana at Minimalist Baker and it immediately sounded good. While we don't usually order curry, we have tried it and liked it. Jess isn't about the vegetarian lifestyle, so I went ahead and added a chicken breast. But you definitely do not have to! This has a lot of flavor and depth and all that stuff without it.

I altered the recipe just a bit, but not a ton. If you'd like the vegan version, then head on over to the link above.

Ingredients
2 tablespoons coconut oil
4 clove garlic, minced
1/2 small onion, diced
1 tsp ground ginger
1 shredded carrot
1 chicken breast, diced
3.5 tablespoons green curry paste
15 oz chickpeas (garbanzo beans), drained and rinsed
14 oz light coconut milk
1 1/2 cups chicken broth
3 tablespoons honey
1 teaspoon lime juice
1/2 cup dry Jasmine rice

Instructions
Heat oil in a large skillet and add garlic, onion, carrot, ginger, and chicken. Cook until chicken is done.

Add curry paste and stir, cook 1 minute.

Add chickpeas and cook another 3-4 minutes.

Add coconut milk, chicken broth, honey, and lime juice. Bring to a boil then stir in rice.  Turn down to a simmer, cover, and cook 15-20 minutes or until rice is done cooking.
I let mine simmer a little longer with the lid off...solely because we weren't ready to eat yet. That made it thicken up a bit, so more stew-ish than a traditional curry, but still delicious!
I'll probably add more carrots in the future, and maybe some cayenne pepper for more heat.

Saturday, August 22, 2015

Keeping up with the Cleaning

Sorry this is late! I had a really busy Thursday and completely forgot yesterday, so here it is.

It is probably pretty obvious with my organization and Type A-ness that I need things to be clean. Not just clutter-free, but I love having a dust-free home, too! Obviously this is not always achievable, but as a general rule I do 30 minutes of moderate cleaning every weekday and then every two to three weeks I will spend an afternoon deep-cleaning.

On a day-to-day basis I'm a big fan of Clorox disinfecting and cleaning wipes for cleaning bathroom and kitchen surfaces. However every other week I will use a sponge and Clorox Bleach cleaner spray, being careful not to get any on my clothes and rinsing thoroughly! I have a feather duster that I use regularly for a light cleaning, then pledge and a dusting cloth for the deep-cleaning days. That is how I differentiate between a "moderate" and a "deep" cleaning day, it is pretty simple.
My cleaning bucket! I started as my shower bucket at AXO, decorated by my Big Sis, and it has evolved from there. 

Monday: wipe down bathroom counter & sink, clean mirror clean toilet, clean shower

Tuesday: clean kitchen counters, sink, stove, microwave, and refrigerator door/handles

Wednesday: sweep bathroom and kitchen/entry (I also mop these floors every other week or as needed...ahem, dogs.)

Thursday: dust literally every surface that didn't get wiped down on Monday & Tuesday (bookshelves, nightstands, coffee table, TV stand, wine rack, etc.)

Friday: vacuum all carpet (bedroom, living room, and rugs for me)


This schedule works for me because A. I have a flexible work schedule where I'm generally home early and can fit in 20-40 minutes of cleaning every day and B. I have a tiny apartment. I realize that people who have more than 4 rooms in their home, have children, or a much longer workday would struggle with keeping up a routine like this, but I encourage you to set a schedule that works for you and maintain it. I have events in my phone calendar so that it is a recurring reminder that "oh I've gotta sweep the floors when I get home today." Once you do it for a few weeks it becomes second nature, promise. AND you'll feel so much better and rarely* have those "my house is so dirty I have to spend 7 hours making it presentable to company" days.


*I cannot promise "never"

Monday, August 17, 2015

Meal Planning: Snacks

I had to stop myself from calling them "snackies" in the title, because that's typically how I refer to them on a day-to-day basis...because apparently I'm a child.
I've recently discovered this and love it. I just wish it was in water and not "extra light syrup."
This has been established, but I'm really a snacker. I eat when I'm bored or sit still for too long. I've tried to stop  but that just turns me into a hangry monster. So, now I just try to make sure my snacks are healthy and controlled.

1. Fruit - apples, mangoes, grapefruit, berries, bananas & peanut butter (reduced fat)

2. Pretzel sticks - you can eat like 100 of these and it's still only a few calories.

3. Sugar free pudding - just make sure it is sugar free!

4. Popcorn - any and all of it. It's healthier if you pop it yourself, but microwave popcorn is just too easy.

5. Tea - I'm not a huge tea fan, but I have noticed that if I drink a cup of hot herbal tea it reduces my boredom and hunger, so that's good. I like fruity teas: pomegranate or apple.

Thursday, August 13, 2015

Meal Planning: Lunch

Here's post #2 about meal planning; this one is focused on easy and healthy lunches. I currently go home for lunch almost every day because I live so close to work. It's nice for me to get away from the lab for a bit and also the dogs like a potty break during the day. Some of these may not be as feasible if you have to pack a lunch, but can be reserved for a day you're home.

1. Lipton Extra Noodle Soup - this is a staple. a go-to. a favorite. I grew up eating this whenever we just needed something quick or if we were sick. Now when I'm sick I crave it! But I've also recognized that it's pretty filling and not too bad for you. 

2. Tuna & Crackers - fairly self-explanatory. I like Kroger's variation of Wheat Thins. Now Starkist is making some flavored tuna packets and some of them are pretty good, I especially like the hickory flavor. 

3. Tuna Noodle Almost-Casserole - Cook 1-2oz egg noodles, some peas, carrots, and/or broccoli, toss with a packet of tuna, a few spoonfuls of plain low-fat Greek yogurt, salt, & pepper. It's simple but very filling. 

4. Wraps - I'll put pretty much anything in a Flatout Light Wrap. Some of my favorites are buffalo chicken (shredded chicken, Frank's hot sauce, mozzarella cheese, lettuce), Caesar (shredded chicken, light/fat free Caesar dressing, parmesan or mozzarella, lettuce), and pizza (pepperoni, mozzarella, olives, and tomatoes). 

5. Leftovers - Sometimes I'll just go ahead and set aside a container from dinner to eat the next day, pastas and soups seem to get better when they sit in the fridge overnight!